Pages

Showing posts with label Christmas. Show all posts

Monday, December 31, 2012

Christmas, Journeys, and Coming Home ...

This was our last Christmas in our townhouse.  A home where we became a couple, and then parents.  The only home Walter has known.  It's been a wonderful home, full of much joy and happiness.  We'll miss it, but we're also excited about our next home.

Christmas Day was spent at home, with my Mom staying with us to help us celebrate. Walter counted 24 presents with his name on them (!!) ... all were opened and examined in under an hour. He's fast!


I brined our 10-lb turkey the night before after reading so many blogs and articles discussing this technique.  It was so easy to do and tasted incredible. 

Recipe:  24 cups of water, 1 1/2 cups honey, 1 cup coarse salt, 3/4 cup brown sugar, many sprigs of fresh rosemary from our garden, 1 whole garlic bulb peeled and cut into chunks.  All this placed in a big pot to simmer until the salt and sugar had dissolved and blended.  I set it on our outside porch with the lid on to cool in the winter air.  In the meantime I got out a mid-sized cooler and placed ice in bags on the bottom.  Got the turkey out, removing the gizzards and neck (which I used to make gravy).  I placed the turkey in a medium sized clean garbage bag in the cooler and poured the brine in.  I tied it loosely.  Put more ice over, and weighed it all down with several gel ice packs.  I then placed the cooler in our frigidly cold garage overnight.  On Christmas Day I turned the oven on just before 2 PM to 325F.  While the oven warmed up I drained the turkey, wiped it down with paper towels to dry it, and placed it in a large KitchenAid enamel double roaster (that we had purchased a few days ago for $39 - regularly $140).  I melted 1 cup of unsalted butter and brushed it all over the turkey, put the lid on, and placed it in the oven for 2 1/4 hours.  At that point we removed the lid, basted the turkey with the pan drippings and let it continue to roast for 30 minutes.  Then it was out of the oven, lid on to rest, while the rest of the dinner was prepped.

On Boxing Day we headed to the interior to have a few days visit with Manuel's Mom in the Okanagan.  The Hope-Princeton Highway was a bit slushy and slick at times, but our good old Chevy 4x4 K2500 Silverado had no problems getting us there and back.


The drive home was stunning - full of sunshine on fresh, crisp snow.


Now, on New Year's Eve we're home, resting ... before the weekend comes and we start packing!

Happy New Year to everyone - may the coming year bring you much joy and happiness.

Wednesday, December 19, 2012

Gingerbread House Baking

This past weekend Walter, Manuel and I took the time to build a gingerbread house.  Not just your regular five-year-old gingerbread house, but a house that we could practically move into!


Before we got started I checked out the internet for both a recipe and building plans.  The recipe came by way of The Alison Show.  A great website full of crafting and baking.  For the plan ... well, although I found some great ideas, I couldn't find a plan that was quite right.  So, I had to wing it.  Things I learned from winging it?  Don't!  Take the time to draw it out on cardstock, cut it out, tape it out to test it.  It'll save you so much time.

In any case, Walter and I started getting all the ingredients together and making the dough.  (Actually, I sent him off with Daddy to do some storage re-arranging so I could complete this step more quickly.)


Ingredients:
  • Flour - 6 cups
  • Baking Powder - 1/2 teaspoon
  • Ground Ginger - 4 teaspoons
  • Ground Cinnamon - 4 teaspoons
  • Ground Cloves - 1/2 teaspoon
  • Salt - 1/2 teaspoon
  • Butter, softened - 3/4 cup
  • Brown Sugar - 1 1/2 cups
  • Eggs - 2 large
  • Molasses - 1 cup
  • Water - 1 or more tablespoons, if needed
Whisk together the dry ingredients and set aside.  In a mixer cream the butter and sugar together until fluffy (since I don't have a stand mixer I did this by hand).  Add the eggs, one at a time, until blended.  Then add in the molasses.  Now, start adding in the flour mixture, in small batches, blending in as you go.  It will be quite dry - if it's too dry add a tiny bit of water.  It should end up being blended but not sticky.

Divide the dough into four parts and roll each out to 3/8" thickness on wax paper.  You may need a bit of flour if your rolling pin sticks.  Layer these four rolled out dough portions on a cookie sheet using the wax paper as dividers, and place in the freezer for 20 minutes.

Preheat your oven to 350F.

Now you can cut out your gingerbread house using whatever plan you devised.  I doubled the recipe at Manuel's insistence because he thought we would be building big.  I ended up with a LOT of dough - some Walter and I made into gingerbread people, animals, and Christmas images, but I still ended up freezing a lot of dough for a future time.

I found that I needed to spray the cookie sheets with some Pam in order to help the baked gingerbread loosen more easily.  In any case, place your pieces on a cookie sheet and bake for 7-9 minutes.  I used my convection setting and found 8 minutes just right.  Cool on sheet before removing to completely cool.

The next part - the Royal Icing - is the sugary "glue" that keeps all the pieces together.  Alison taught me something new here - meringue powder!  I found mine at Galloway's.  This is a lovely local store that is a great source for European cooking needs as well as having wonderful bulk-style organic items and personal/home care products.  I bought two bags just in case - I have way too much, so I'll have to figure out what else I can make besides royal icing :)

Ingredients:
  • Meringue Powder - 1/2 cup
  • Water - 1 cup (almost)
  • Powdered Sugar - 2 pounds (one of those bags you get in the grocery store)
  • Light Corn Syrup - 2 teaspoons
First, sift the powdered sugar and set aside.  Next, you need to whisk the meringue powder and water until foamy.  I used my hand mixer for this.  It doesn't take long.  Now, slowly add in the powdered sugar.  Mix on low until blended, about 5 minutes.  Then, add in the corn syrup and mix on medium speed until it is glossy and stiff peaks form.

I used a jar and placed sandwich bags over the jar, pushing the bag around the jar opening.  Then I could scoop the royal icing into the bag, press out the air, and zip it up before snipping off a corner - this became my "piping" bag.  I would have used my piping kit but it's in storage until we move.

Because we had made such big sides and roof pieces we found we needed to butter the back side of the pieces with royal icing and let this harden before proceeding.  This made the pieces firmer and more stable.  Even doing this we needed to allow the frame of the house to set over night before completing things the next day.  Yes, a two-day gingerbread house!  To help stabilize the whole structure even more we used toothpicks and bamboo skewers.


Now came the part that Walter was impatiently waiting for - decorating!  We spent Friday morning before work at Save-on-Foods in the bulk section picking out candies to use for this purpose ... plus we picked up some more at Galloway's on Saturday.


I piped while Walter followed behind placing every single piece of candy he could.  He even placed large handfuls inside the house!  We had a great time ... although, when the last piece was stuck on Walter wanted to know if we could start eating the gingerbread house.  I said NO - we need pictures.  And Daddy said NO - we want Oma to see it too!  Every day he asks - so far, we've had enough gingerbread men to keep him occupied!

Thursday, December 13, 2012

Christmas Tree Decorating

Remember the tree we cut on Sunday?  Daddy and Mommy put it in the stand Monday night and Walter got right to work decorating it.  Don't you just love what he did?


In case you can't see all the details, let me give you a closer shot ...


Did you notice the Rudolph red-nose at the top?  Walter thought that was the perfect spot - right on the tip of the star.  Every day he adds a little more.  Today, Daddy and Walter did the guy thing.  You know, dinner at White Spot, buying a new Christmas ornament, and a visit with Santa.  So, two new ornaments to add to the tree tonight.

Ah, to be five, eh?

Wednesday, December 12, 2012

Christmas Tree Shopping

We've been buying from U-Cut Farms for several years now - ever since we learned that those lots selling "fresh" cut trees costing upwards of $75 often cut their trees 6-8 weeks before they even reached the point of sale.  We were so disappointed.

This year we tried out a few different locales, but in the end we came back to our favourite - H&M, located in Richmond on Steveston Highway just west of Gilbert.  We got a 6-foot Grand Fir for $45 inclusive.  So full and wide we had a hard time getting it through the front door!  And the smell?  Amazing.


As usual, we found the tree we would take home within minutes of walking to the Grand Fir area, but also as usual ... Manuel spent more time searching for something "better."  When Walter and I finally convinced Manuel we had picked the right one he got to work cutting while Walter oversaw things.


It was a bit wet out ... we were forced to make hot chocolate when we got home.

Tuesday, December 11, 2012

Christmas Card DIY

I used to buy Christmas cards in a box.  Once we had Walter I decided to make our own so that I could incorporate a picture of him each year - basically showing the changes in him every Christmas.

The first three years I ordered cards on-line, uploading photos.  The first one worked out quite well.  The second year - the store I ordered through changed printing companies and the quality sucked.  The third year was OK - I found a different company, but it was pricier.  Still, I was ready to get a little more creative.  So, for the fourth year I bought decorative cards with envelopes and used our own ink jet printer to create the photo to be attached.  It was a fair bit of work, but I quite enjoyed it.

So, this year I'm back at it again.  I've decided I'll show what's involved and tally up the costs.  Let's see how much it REALLY costs to make your own cards.

Here's what I bought:
  • Canon Photo Paper (100 4x6) - $17.85 ... with a second package free
  • Photocard kit with cards and envelopes (20 x 5 packages) - $74.90
  • Mailing Labels (100) - $6.99
  • Clear Labels for inside card text (60 x 2 packages) - $30.92
  • Return Mailing Labels (350) $14.96
  • Business Card Stock (200) - $17.95
  • Ink Jet Cartridges for yellow, cyan, magenta - $20.99 x 3
The business card stock was to give out our new home address - not something that would always be necessary.  The ink jet cartridges vary in which ones come up for replacement, but I always seem to need to replace at least 2-3 of them each year while doing this project ... so we'll include them.

First, let's add up this list, add in the tax (here in BC we currently have HST of 12%).  Then we'll create a unit price and add that to find out the base cost per card.  Using Excel to tally up the overall cost - $253.72 with HST.  Ouch!  However, the actual cost per card runs to $1.74 (without the business card $1.64).  I usually end up using between 85 and 100.

My Christmas card workstation is our dining table! I love my Fiskars cutter - a best buy for sure.


First, I had to design the photo to place on the front of the card.  The previous weekend I had gotten Walter to pose with some moving boxes I had decorated with crafty snowflakes.  I wasn't totally happy with the results.  I played around with various photos and finally came up with this:


This incorporates our early Christmas art project, the moving boxes with snowflakes and a photo of Walter taken in November at the farm.  I printed off 85 in batches of five, letting them dry before stacking them.

Next, the inside label with a simple greeting and our names.  Then, I spent some time typing in contact information for everyone who was going to receive a card.  At this point I had a better idea of how many cards I would be producing.  After printing off the mailing labels, I created return mailing labels.  Business cards were next.  I used some clipart to include a bit of graphics in the form of a colourful moving truck with the phrase "we're moving!" emblazed on its side.

I created a workflow space for myself and started sticking labels - inside the card for the greeting text, then sticking the photo to the card.  Then labeling the envelope with the mailing and return mailing address labels.  Stuffed the card in, sealed the envelope.  Next!

I spent Saturday night printing the photos, and Sunday afternoon/evening doing the rest.  Probably 6-8 hours total.

Will I do it again next year?  You bet!

Sunday, December 02, 2012

Secret Santa for Office Times

Each year my office holds a Secret Santa event.  There is a price limit of $15 - not much, but the idea is not to alienate those who can't afford much.  I haven't been lucky in the people I've drawn - I haven't known any of them well and trying to find out things about them without making it obvious doesn't always work.  Take this year - I got the new person to the office.  All I know about her is that she's recently graduated with an undergrad degree and seems to like 10-pin bowling (at least she was game to participate with co-workers after work!).  She's only been with us for two months and no one seems to know too much about her either.  I had the opportunity to chat with her for a few minutes, but no luck in sussing out enough details to make gift ideas easier.

I ended up at Michael's today looking for some yarn for my Mother-in-Law.  No luck with the yarn colour matching, but I came up with some interesting gift ideas for my Secret Santa gift.

  1. Stacked Snowman tin.  Quite adorable.  Three compartments of graduating sizes.  I thought - candy in the smallest, hot chocolate mix in the next size up, and baked cookies in the largest.  But the tin was $13.99 plus tax.  Didn't leave much room for the contents.  Plus the gift seemed a little lame.
  2. Next a set of mismatched socks.  Funky socks - three individuals, all different colours, designs, with buttons sewn on.  Little doodads with button holes so that people can add individuality to each sock.  Sock set was $9.99, doodads were $3.99.  Would put me slightly over, but not too bad.  Still, I wasn't sure if my giftee was funky like that.
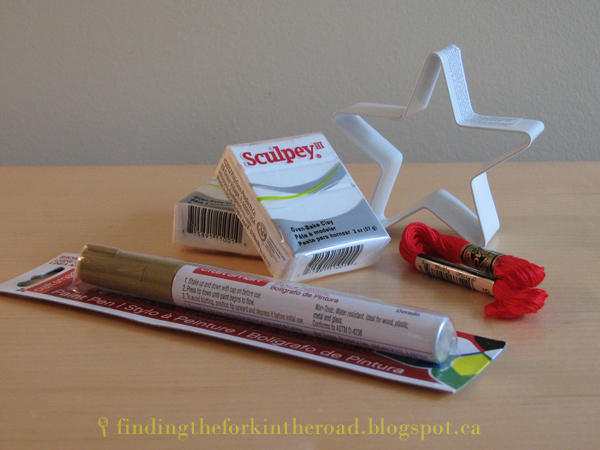
  3. Finally, I remembered reading a blog last night about making Christmas ornaments with Sculpey baked clay.  Two packages of white Sculpey ($3.99 each), one acrylic gold ink pen ($3.99), star cookie cutter ($1.50) and some red needlepoint thread ($0.50).  Again, just over $15 with tax, but at least this gift wouldn't be too funky and definitely had a Christmas theme to it.
In the end I went with #3.  I'll print the blog instructions on the office colour printer and create my own gift package.  I hope she enjoys crafting with this gift and makes some ornaments for her home.


What do you do for gift ideas when participating in Secret Santa events?  Spend a lot of time getting it right or grab the first thing nearest the cash register?  Perhaps you re-gift/re-purpose?

Sunday, November 25, 2012

Christmas Craft - 3D Picture

Walter, as usual, is very excited about Christmas.  Gifts, candies, lots of pretty lights and decorations ... he's in heaven!  So, I thought I'd do a little quick craft with him today to start the season off.

I went to Ikea Friday night to get the supplies:
  • White 3D picture frame
  • Shiny red garland
  • Set of natural and red hearts
  • Set of felt birds

Walter was very excited and pulled everything out while I was still putting the laundry in the washing machine!  It was pretty easy to do.  We simply took the back off the picture frame and started laying things down, temporarily putting the back on and having a look.  A few tweaks did it.


We first placed it on the mantel, but decided that a glass object leaning on a mantel wasn't a great idea with an excited five-year-old ... so, it's sitting on my favourite teak desk next to the fireplace.


First signs of Christmas in the house!