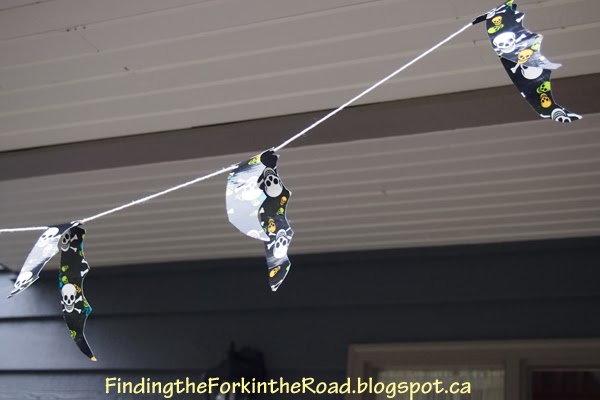
I love Valentines Day, Easter, July 1st Canada Day, Thanksgiving, Halloween, and Christmas. Walter makes these times even more special, and I love to do something memorable to make a lasting impression. Halloween's great because I can be a little silly about things. When I saw someone using black duct tape to make bats I thought it looked easy and doable. Of course, I didn't have black duct tape, but I did have something a bit ghoulish and definitely Halloween-ish. So, while Walter sat on the dining table playing with his Lego I whipped up a garland of duct tape bats.
Aren't they charming? And so easy to do. All you need is a roll of duct tape, some string, and scissors.
I cut a length of string - in my case I did about five feet. I then began by cutting off a strip of duct tape about 8" long, laid it sticky side up and placed the string about mid-way between the two ends. I then cut off another strip of duct tape the same length and stuck it on top of the first piece, sandwiching the string between. I cut a simplistic bat shape out of the sandwiched tape, with the string taking up the body/head portion. One bat down, five more to go.
The final garland took all of 10-20 minutes to do.
The duct tape gives the bats just enough shape while allowing some "natural" batty movement to occur. The best part is that they are water proof and we can hang them outside without worrying about the rain. They were the final piece of Halloween decorating that went up today.
You might be noticing a different colour to our front door, mailbox ... and, in fact, to the house itself. Yes, we had the exterior of the house painted. Once Manuel has the shutters back in place I'll take some photos and show you the results.
Before we did our Halloween decorations outside the house we went for our yearly pumpkin picking on Westham Island. This has become something of a family tradition for us. I think this must be our fourth year going? The farm we go to does a great job in getting everyone into the spirit.
Along with the pumpkin theme, the farm has some animals that the children love to visit - donkeys, goats, chicken, and cows.
Of course, the most important part of the day is finding our pumpkins.
The whole day was very inspiring ... especially for Walter who started practicing his monster moves.
The funny thing is, he's not going as a monster - he chose a policeman costume!
Showing posts with label craft. Show all posts
Sunday, October 20, 2013
Monday, June 10, 2013
Goals for June
I promised myself I would set out some goals each month. Here are my goals for June ...
1. Back in April I got a free lamp at a yard sale. I knew it needed work - it had a taped up cord (possible fire hazard? Electrocution?!) and bent lampshade hardware - but I thought it had a good base and for $0.00 I thought I would try to do something with it. I've bought the lamp kit (Atron Lamp Kit at Home Depot - $17.98); Walter thought I should spray paint the base white which I think is a perfect idea; and I just need to figure out what to do with the brownish shade - keep it, update it, or change it out.
2. We just got our blinds for the front upstairs windows installed. Now, I desperately want to change out the rose-coloured shears that are in the master bedroom. I've never liked the dusty rose shears, but they work ... so I thought I should wait. The waiting is wearing me down, so I'm thinking of sewing some curtains. Of course, I'll need a new rod with brackets to replace the existing hardware, but I do have several fabrics at hand that could work.
3. I've been putting all the objects we no longer want into a pile in the basement with the thought of having a garage sale once there is enough items to justify the effort. However, I recently read in our local paper that a twice monthly boot sale happens. For $10 I can join in the fun, selling my stuff from the back of my car (hence the "boot" reference ... so very British). The first boot sale of the year is June 8th. I won't be ready for that one, but I'm hoping I can have things organized enough to join in on June 22nd.
4. I was reading local gal Ashli's blog, Mini Manor Blog, which happened to point me to Jen's Simcoe Street blog ... which led me to Carmel's Our Fifth House. Phew! At that point I had to stop because a possible project caught my eye.
See those boards with the clothes pins holding artwork? That would be perfect to hold/display artwork that Walter does. Also great for artwork that needs some drying time. I could also envision using something like this for holding important paperwork that needs to be kept handy. I've already got all the materials necessary to make this happen, including the clothes pins. Hmmm :)
1. Back in April I got a free lamp at a yard sale. I knew it needed work - it had a taped up cord (possible fire hazard? Electrocution?!) and bent lampshade hardware - but I thought it had a good base and for $0.00 I thought I would try to do something with it. I've bought the lamp kit (Atron Lamp Kit at Home Depot - $17.98); Walter thought I should spray paint the base white which I think is a perfect idea; and I just need to figure out what to do with the brownish shade - keep it, update it, or change it out.
2. We just got our blinds for the front upstairs windows installed. Now, I desperately want to change out the rose-coloured shears that are in the master bedroom. I've never liked the dusty rose shears, but they work ... so I thought I should wait. The waiting is wearing me down, so I'm thinking of sewing some curtains. Of course, I'll need a new rod with brackets to replace the existing hardware, but I do have several fabrics at hand that could work.
3. I've been putting all the objects we no longer want into a pile in the basement with the thought of having a garage sale once there is enough items to justify the effort. However, I recently read in our local paper that a twice monthly boot sale happens. For $10 I can join in the fun, selling my stuff from the back of my car (hence the "boot" reference ... so very British). The first boot sale of the year is June 8th. I won't be ready for that one, but I'm hoping I can have things organized enough to join in on June 22nd.
4. I was reading local gal Ashli's blog, Mini Manor Blog, which happened to point me to Jen's Simcoe Street blog ... which led me to Carmel's Our Fifth House. Phew! At that point I had to stop because a possible project caught my eye.
See those boards with the clothes pins holding artwork? That would be perfect to hold/display artwork that Walter does. Also great for artwork that needs some drying time. I could also envision using something like this for holding important paperwork that needs to be kept handy. I've already got all the materials necessary to make this happen, including the clothes pins. Hmmm :)
Labels:
craft,
DIY,
goals,
organization
Tuesday, December 11, 2012
Christmas Card DIY
I used to buy Christmas cards in a box. Once we had Walter I decided to make our own so that I could incorporate a picture of him each year - basically showing the changes in him every Christmas.
The first three years I ordered cards on-line, uploading photos. The first one worked out quite well. The second year - the store I ordered through changed printing companies and the quality sucked. The third year was OK - I found a different company, but it was pricier. Still, I was ready to get a little more creative. So, for the fourth year I bought decorative cards with envelopes and used our own ink jet printer to create the photo to be attached. It was a fair bit of work, but I quite enjoyed it.
So, this year I'm back at it again. I've decided I'll show what's involved and tally up the costs. Let's see how much it REALLY costs to make your own cards.
Here's what I bought:
First, let's add up this list, add in the tax (here in BC we currently have HST of 12%). Then we'll create a unit price and add that to find out the base cost per card. Using Excel to tally up the overall cost - $253.72 with HST. Ouch! However, the actual cost per card runs to $1.74 (without the business card $1.64). I usually end up using between 85 and 100.
My Christmas card workstation is our dining table! I love my Fiskars cutter - a best buy for sure.
First, I had to design the photo to place on the front of the card. The previous weekend I had gotten Walter to pose with some moving boxes I had decorated with crafty snowflakes. I wasn't totally happy with the results. I played around with various photos and finally came up with this:
This incorporates our early Christmas art project, the moving boxes with snowflakes and a photo of Walter taken in November at the farm. I printed off 85 in batches of five, letting them dry before stacking them.
Next, the inside label with a simple greeting and our names. Then, I spent some time typing in contact information for everyone who was going to receive a card. At this point I had a better idea of how many cards I would be producing. After printing off the mailing labels, I created return mailing labels. Business cards were next. I used some clipart to include a bit of graphics in the form of a colourful moving truck with the phrase "we're moving!" emblazed on its side.
I created a workflow space for myself and started sticking labels - inside the card for the greeting text, then sticking the photo to the card. Then labeling the envelope with the mailing and return mailing address labels. Stuffed the card in, sealed the envelope. Next!
I spent Saturday night printing the photos, and Sunday afternoon/evening doing the rest. Probably 6-8 hours total.
Will I do it again next year? You bet!
The first three years I ordered cards on-line, uploading photos. The first one worked out quite well. The second year - the store I ordered through changed printing companies and the quality sucked. The third year was OK - I found a different company, but it was pricier. Still, I was ready to get a little more creative. So, for the fourth year I bought decorative cards with envelopes and used our own ink jet printer to create the photo to be attached. It was a fair bit of work, but I quite enjoyed it.
So, this year I'm back at it again. I've decided I'll show what's involved and tally up the costs. Let's see how much it REALLY costs to make your own cards.
Here's what I bought:
- Canon Photo Paper (100 4x6) - $17.85 ... with a second package free
- Photocard kit with cards and envelopes (20 x 5 packages) - $74.90
- Mailing Labels (100) - $6.99
- Clear Labels for inside card text (60 x 2 packages) - $30.92
- Return Mailing Labels (350) $14.96
- Business Card Stock (200) - $17.95
- Ink Jet Cartridges for yellow, cyan, magenta - $20.99 x 3
First, let's add up this list, add in the tax (here in BC we currently have HST of 12%). Then we'll create a unit price and add that to find out the base cost per card. Using Excel to tally up the overall cost - $253.72 with HST. Ouch! However, the actual cost per card runs to $1.74 (without the business card $1.64). I usually end up using between 85 and 100.
My Christmas card workstation is our dining table! I love my Fiskars cutter - a best buy for sure.
First, I had to design the photo to place on the front of the card. The previous weekend I had gotten Walter to pose with some moving boxes I had decorated with crafty snowflakes. I wasn't totally happy with the results. I played around with various photos and finally came up with this:
This incorporates our early Christmas art project, the moving boxes with snowflakes and a photo of Walter taken in November at the farm. I printed off 85 in batches of five, letting them dry before stacking them.
Next, the inside label with a simple greeting and our names. Then, I spent some time typing in contact information for everyone who was going to receive a card. At this point I had a better idea of how many cards I would be producing. After printing off the mailing labels, I created return mailing labels. Business cards were next. I used some clipart to include a bit of graphics in the form of a colourful moving truck with the phrase "we're moving!" emblazed on its side.
I created a workflow space for myself and started sticking labels - inside the card for the greeting text, then sticking the photo to the card. Then labeling the envelope with the mailing and return mailing address labels. Stuffed the card in, sealed the envelope. Next!
I spent Saturday night printing the photos, and Sunday afternoon/evening doing the rest. Probably 6-8 hours total.
Will I do it again next year? You bet!
Sunday, December 02, 2012
Secret Santa for Office Times
Each year my office holds a Secret Santa event. There is a price limit of $15 - not much, but the idea is not to alienate those who can't afford much. I haven't been lucky in the people I've drawn - I haven't known any of them well and trying to find out things about them without making it obvious doesn't always work. Take this year - I got the new person to the office. All I know about her is that she's recently graduated with an undergrad degree and seems to like 10-pin bowling (at least she was game to participate with co-workers after work!). She's only been with us for two months and no one seems to know too much about her either. I had the opportunity to chat with her for a few minutes, but no luck in sussing out enough details to make gift ideas easier.
I ended up at Michael's today looking for some yarn for my Mother-in-Law. No luck with the yarn colour matching, but I came up with some interesting gift ideas for my Secret Santa gift.
- Stacked Snowman tin. Quite adorable. Three compartments of graduating sizes. I thought - candy in the smallest, hot chocolate mix in the next size up, and baked cookies in the largest. But the tin was $13.99 plus tax. Didn't leave much room for the contents. Plus the gift seemed a little lame.
- Next a set of mismatched socks. Funky socks - three individuals, all different colours, designs, with buttons sewn on. Little doodads with button holes so that people can add individuality to each sock. Sock set was $9.99, doodads were $3.99. Would put me slightly over, but not too bad. Still, I wasn't sure if my giftee was funky like that.
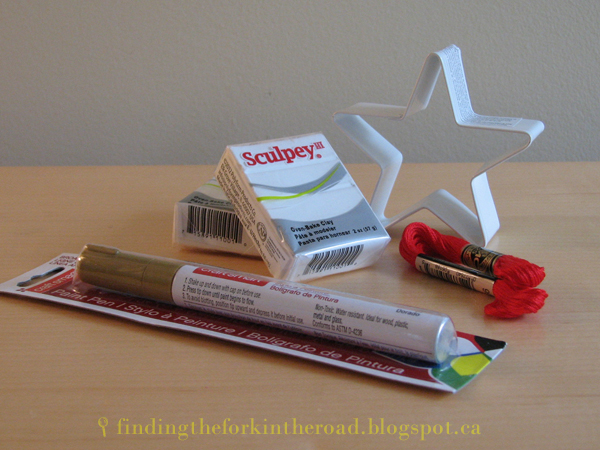
- Finally, I remembered reading a blog last night about making Christmas ornaments with Sculpey baked clay. Two packages of white Sculpey ($3.99 each), one acrylic gold ink pen ($3.99), star cookie cutter ($1.50) and some red needlepoint thread ($0.50). Again, just over $15 with tax, but at least this gift wouldn't be too funky and definitely had a Christmas theme to it.
What do you do for gift ideas when participating in Secret Santa events? Spend a lot of time getting it right or grab the first thing nearest the cash register? Perhaps you re-gift/re-purpose?
Sunday, November 25, 2012
Christmas Craft - 3D Picture
Walter, as usual, is very excited about Christmas. Gifts, candies, lots of pretty lights and decorations ... he's in heaven! So, I thought I'd do a little quick craft with him today to start the season off.
I went to Ikea Friday night to get the supplies:
Walter was very excited and pulled everything out while I was still putting the laundry in the washing machine! It was pretty easy to do. We simply took the back off the picture frame and started laying things down, temporarily putting the back on and having a look. A few tweaks did it.
We first placed it on the mantel, but decided that a glass object leaning on a mantel wasn't a great idea with an excited five-year-old ... so, it's sitting on my favourite teak desk next to the fireplace.
First signs of Christmas in the house!
I went to Ikea Friday night to get the supplies:
- White 3D picture frame
- Shiny red garland
- Set of natural and red hearts
- Set of felt birds
Walter was very excited and pulled everything out while I was still putting the laundry in the washing machine! It was pretty easy to do. We simply took the back off the picture frame and started laying things down, temporarily putting the back on and having a look. A few tweaks did it.
We first placed it on the mantel, but decided that a glass object leaning on a mantel wasn't a great idea with an excited five-year-old ... so, it's sitting on my favourite teak desk next to the fireplace.
First signs of Christmas in the house!
Subscribe to:
Posts (Atom)