Pages

Showing posts with label recipes. Show all posts

Tuesday, May 06, 2014

Learning the Art of Bread Making

I have been making bread for many years now.  Sometimes with success, sometimes ... well, the results haven't always made me happy.  With the recent purchase of my Bosch Universal Plus Mixer (four months and counting!) I have not had a failure.  Is it the machine or have I been slowly learning the art - and science - of bread making?

Bread, at it's essence, is the simple marriage of wet (water, milk) with the dry (flour, salt, sugar).  The leavening agent (yeast) along with some lubricant (oil, butter) brings the happy union together.  The heat of the oven finishes things off.  The result?  Heaven.  Yet, making bread scares most of us.  I know it did me for many years.  Bread can be temperamental.  It needs to be worked to bring out the glutens in such a manner that the yeast will properly marry to it.  Only then will you get the proper rise required for a delicious loaf of bread.  Kneading, so required for that success, is something learned over time.

I have to give credit to my pizza making recipe for teaching me how to knead.  The recipe created a small enough amount of dough that I was able to learn how to knead.  I learned the right look and feel of the dough.  The soft touch that meant the dough was ready to be rested.

Having learned how to knead, the Bosch has given me the ability to vastly increase the amount of dough I can make at one time.  A recipe that makes 2-3 loaves of bread can easily be doubled.  The machine takes care of the arduous task of kneading.  I simply look on.  I do clean up, but am always drawn back to the Bosch.  I stare at the mixing dough, seeing it pull away from the sides of the bowl, being kneaded by the dough hook.  I occasionally stop the machine and touch the dough.  Too sticky?  I gently add a bit more flour and let the kneading continue.  After 10 or so minutes I stop my Bosch and do a final touch of the dough.  Soft, pliable, but not sticky?  Perfect.  I pull it out, giving it just a bit more kneading by hand.  Then into an oiled bowl, turning the dough over to make sure it's coated.  Covered with a tea towel, I place it in the oven for 40-70 minutes of proofing.

The proofing is when the dough rests and grows.  it should double.  There is nothing more magical then seeing your dough doubled.  Success.  You kneaded the dough perfectly.  Once doubled, you take it out ... and pound the dough, shrinking it back to somewhere halfway between it's doubled size and it's original size.  At this point there are so many things you can do with it.  Pizza shells, buns, breads, cinnamon rolls, twists.

With a doubled recipe I usually do three loaves of bread and use the remaining dough for treats.  I've made cinnamon rolls, hot dog buns, rolls, and pizza.  Bread sticks are always fun for a change.

I want to share with you one of the recipes I have been using recently.  It's the culmination of 3-4 recipes from various sources, tweaked until the resulting dough works for me.  You might want to tweak it a bit yourself, so that it becomes yours.

One special note - please use yeast from a jar.  Those individual packages?  I've NEVER made great bread with those.

Ingredients

Water, warm - 1 cup
Active Dry Yeast - 4 1/2 teaspoons
Sugar - 2 teaspoons

Water, warm - 4 cups
Salt - 3 to 4 teaspoons
Sugar - 1/2 to 2/3 cup
Oil - 1/4 cup
Flour, whole wheat or rye - 2 cups
Vital Wheat Gluten - 1 tablespoon
Flour, unbleached all-purpose - 12 cups

This recipe is for a double batch.  If you and your mixer can't handle this amount feel free to cut everything in half.  No worries.  Note also, my instructions will be for the Bosch.

First, place the first 1 cup of warm water and 2 teaspoons of sugar into the mixer bowl.  Swirl with your fingers to blend together.  Add the yeast and swirl again, so that the yeast is wet.  Cover and let rest for approximately five minutes.  While this is happening, measure out the remainder of your ingredients.

Once the yeast mixture has become frothy, you can continue.  In a separate bowl mix the remaining 4 cups of warm water, salt, sugar, and oil.  Mix and add to the mixer bowl.  Pulse to combine.  Next add the whole wheat or rye flour and the vital wheat gluten.  If you are using only white flour you probably won't need the vital wheat gluten.  It's useful when using flours that need more protein, providing an improvement in the texture and elasticity of the dough. Pulse to combine.  Add approximately 4 cups of the regular flour and start the mixer on 1.  Watch as the dough hook stirs the ingredients.  Slowly add more flour.  The mixture will start to thicken and the kneading begins.  Continue adding flour, slowly, until the dough leaves the sides of the mixer bowl clean.  Now let the mixer knead for another 5-10 minutes.  Check the dough occasionally to see if it's too sticky.  If it is, add just a little more flour (perhaps 1/4 cup at a time).  You don't want to add too much flour - then you'll have a dry, unmanageable lump of dough.  A little sticky is better than too dry.


Determining when enough kneading has occurred takes some practice.  The dough shouldn't be sticky.  It should feel as soft as a babies bum.  Take the bowl off the machine.  Pull out the shaft from underneath and remove the dough hook.  Pull the dough out of the bowl and place on a lightly floured surface. 


Knead just a few times to make sure the dough is at the right consistency.  If it isn't, you'll have to do a bit more kneading by hand.  Place the dough into an oiled bowl that will provide enough room for doubling of the dough.  Make sure the dough is rolled around in the oil so that all the surfaces are oiled.  An un-oiled dough will dry and crack and this cracked surface is impossible to remove or re-incorporate into the dough. 


Cover the bowl with a tea towel and place in a draft-free place.  (Dough doesn't like to get cold ... cold slows the doubling time.)  I like to place my dough in my oven.  This keeps it warm, and safe.  Set the timer for 40 minutes.  At the 40 minute mark check the dough.  If it's doubled, great.  If not estimate how much longer.  Sometimes it can take a total of 60-70 minutes.  For dough with more whole wheat/rye it can take longer. In the winter dough takes longer to rise then during the summer months.  Wet weather, dry weather ... all types of weather will effect your dough.


Once the dough has doubled take it out of the bowl.  Place it on your counter and pound it down.  you aren't beating the life out of the dough, more like pressing the excess air out of it.  It shouldn't shrink down to it's original size, but somewhere between.  Now, you can cut it into pieces for various baking items.  This amount of dough will make 4-6 loaves of bread.  I only have two loaf pans so I always make two loafs of bread, I use a square cake pan for a square loaf, and perhaps the rest of the dough becomes rolls or breadsticks placed on a cookie sheet ... or I might roll it out for a couple of large-sized pizzas.  For the bread pans and cookie sheets a light oil will prevent the bread from sticking.  I place these filled pans on top of my stove and cover everything with tea towels.  While the dough rests and rises again I heat the oven to 350F.  Usually 25-30 of rising is all that is necessary.  For the pizza dough, no rising is necessary - once you've rolled it out you can put your sauce, toppings, and cheese and bake at 425F for approximately 20 minutes.  For the rest of the breads, 25-40 minutes of baking at the aforementioned 350F will do.


I hope you try your hand at bread making.  Once learned, a whole new world of baking is possible.  You'll be released from ever needing to buy store-bought, plastic-wrapped bread from the grocery store.  You'll know what your bread contains.  You'll actually be able to pronounce every ingredient.  You'll be able to create something wonderful that you can share with friends and family.

Saturday, November 23, 2013

Apple Pie

Apples, apples.  Everywhere apples.


I've been trying out several pie crust recipes as a means to work through that huge load of apples we have.  I think I've finally settled on one ... unfortunately, I can't remember where I got it from.  I found the ones that incorporated egg to be a bit chewy, and not flakey enough.  This recipe has a very simple list of ingredients.  With all pie crusts, the results are very dependent on the execution of the recipe.  Cold is your friend - pastry dough loves to be cold.  Keep that in mind before considering pie making.

Pie Crust Ingredients:

Flour - 2 cups
Salt - pinch
Sugar - 1 tablespoon
Butter, cold - 1 1/2 sticks (3/4 cup) cubed
Ice/Cold Water - 4 to 8 tablespoons

Filling Ingredients:

Apples, peeled, cored, diced - 6, approximately
Sugar - 1/2 cup, approximately
Minute Tapioca - 1 tablespoon

Start with the pie crust ... you can even do this several days ahead (or keep the unrolled dough in the freezer for longer - just wrap well so it doesn't dry out).  Put all the dry ingredients in a good sized bowl.  Take your cold, cubed butter and start by tossing them in the dry ingredients.  Then, use your fingers to work the butter in.  You aren't trying to make the butter blend into the dry ingredients ... rather you are trying to break the butter into smaller pieces with some flour coating added to them.  Your goal is coarse crumbs.  If you overwork this part you'll end up with pastry that won't be very flakey.

Once you've got your coarse crumbs add one tablespoon of ice cold water - toss the flour mixture.  Continue adding water by tablespoons and tossing until the mixture is moistened, but not wet.  Form into a ball and flatten to a thick disk.  Wrap in Saran and put the disk into the fridge for at least 30 minutes.  These steps might have sounded quick-quick.  They should be.  You want the pastry dough into the cold fridge as soon as possible.  [It's at this point that you can leave pie making to another day, week, or month.]

While the dough is chilling, prepare your filling.


Wash the apples.  Peel, cut into quarters, and take each quarter and remove the core.  Slice the cored quarter in half and then slice these halves into thin chunks.  Yes, this goes against that pretty slivered apple pie you might be envisioning ... but, really?  Chunks are far easier to cut through once the pie is baked.  The pie won't fall apart, it also cooks better, and it's easier to eat.  And ... it will still look lovely.


Now, add the sugar and tapioca to your cut up apples.  The sugar is an approximate measurement because it depends on the apples you are using and your personal taste.  If you are using tart apples you may well want a bit more sugar, if they are sweet (like mine were) go for less.  the tapioca will help bind the liquids from the cooking apple, making a nicer end product.  After adding the sugar and tapioca toss to coat ... you might even get in there with your hands because you really want everything well incorporated.
Now, you may have noticed that there is no cinnamon mixed in with the apples.  What sacrilege you might say.  I ... I prefer a simpler pie, free of other flavours that might overshadow the loveliness of the apple.  I urge you to try my approach.  I think you'll be pleasantly surprised.
Turn your oven to 400F to get it up to temperature.  Find your pie plate - you'll want it ready for when you need it.  I prefer a Pyrex (glass) one for pie baking.

Back to the fridge for your pastry dough.  Break it into 2/3 .. 1/3 (2/3 for the bottom, 1/3 for the top).  Lightly flour your work surface and use a good rolling pin - I use a marble rolling pin for pastry dough since it's heavy and colder than a wooden one.  Roll your 2/3 pastry to an even thickness.  Try to do this quickly.  This is the hard part where you have the greatest potential to ruin your dough by overworking it.  Somehow you need to get it thin enough and big enough to fit into your pie dish without toughening the dough.  Once it's big enough move it into your pie plate.  Don't worry if there are cracks and funky seams.  Patch where necessary by finding larger overhangs and cutting them to use elsewhere.  It doesn't have to be perfect.  It'll all bake up fine in the end.

Add your filling and then roll out the 1/3 remaining piece of pastry dough.  Place it on top and pinch the bottom and top portions together, creating little ripples with your fingers (some people use a fork, but I think the finger press looks more authentic).


Place the prepared pie in your oven for 45-60 minutes.  You want to see some bubbling happening, but you also want to make sure the pastry doesn't get too dark.  Some people use tin foil around the edges to help lessen this - that's your choice.

When it's ready, take it out to cool.  The cooling will allow the juices and tapioca to congeal nicely.  Of course, it's hard to resist a fresh pie.


We had unexpected guests show up within 30 minutes of this pie coming out of the oven.  Apparently it was delicious!

Monday, October 28, 2013

Fruit Torte - Take Two

Last week I made a fruit torte where I first put the batter in and then topped it with fruit.  As soon as it was in the oven I thought the recipe lent itself to being an upside down cake.  That's a cake where you put the fruit in the bottom of the pan and put the batter on top - hence the upside down label.

I started by rubbing some butter in the bottom of the baking pan, sprinkled some brown sugar on top of that, and then placed the fruit (in our case frozen blueberries) so that they covered most of the bottom, allowing only a bit of brown sugar to show through.  I then topped this with a bit more brown sugar.  I didn't alter the first recipe batter - I mixed it up and put it directly on top of the fruit/brown sugar layer.  It did take a bit of spooning and gentle spreading to get the fruit covered, and it certainly wasn't the smoothest of batters when I was finished ... but baking settled everything down into a more uniform top.

It doesn't look like much here - I'm sure if I'd taken the time to flip it onto a plate it would have looked much more elegant ... but it was so yummy that it just didn't last.


The last bite ...


This torte did not last more than a few days.

Tuesday, October 22, 2013

Fruit Torte

It's been awhile since I've blogged about any recipes that I've tried out.  Which isn't to say I haven't tried out any.  It's just that baking and cameras don't mix and I sometimes (often) forget to pull out the camera.  I did manage to pull out the camera to get a shot of this very yummy fruit torte before it disappeared.


I found this recipe on the Smitten Kitchen blog.  It goes by the name Purple Plum Torte.  I didn't have any plums, but we have about fifteen boxes of apples ... so I made an Apple Torte. 

Yes, Manuel picked these fifteen or so boxes of apples in late September when he went to help harvest the grapes at his parents farm.  Yes, we have been giving away a lot of apples to friends.  Yes, we have a second fridge just for this over-abundance of fruit.  Yes, I think we are crazy too ;)

The recipe is incredibly easy, so I hope you'll try it.  I expect you could use almost any fruit of your choosing.

Ingredients:

Flour - 1 cup
Baking Powder - 1 teaspoon
Salt - large pinch
Sugar 1 cup // plus 1-2 tablespoons
Unsalted Butter, softened - 1/2 cup
Eggs - 2 large
Fruit - 2 apples
Lemon Juice - 2 teaspoons
Cinnamon - 1 teaspoon

Heat oven to 350F.  Pull out a 9" spring form pan so that it's ready.

Peel, core, and slice the apples.  Place in a medium bowl.  Sprinkle the 1-2 tablespoons of sugar, followed by the cinnamon and lemon juice.  Mix with your hands to coat.  Set aside.

Stir together the flour, baking powder, and salt in a medium bowl.  In a large bowl cream the butter and sugar until fluffy and light in colour.  Add the eggs, one at a time.  Then add the dry ingredients, mixing until just combined.

Spoon the batter into the spring form pan and smooth the top.  Arrange the fruit all over the batter, pushing slightly in.  bake until the cake is golden and a toothpick inserted in the centre comes out free, about 45-50 minutes (40-45 convection oven time, with 325F).  Cool on a rack.

Saturday, April 06, 2013

Healthy and Delicious Chocolate Chip Cookies?!

I've been sick all week with a bad chest cold and yesterday I was finally starting to feel a bit better.  Enough that I was getting the urge to do some baking.  Naturally, I began reading some of my favourite foodie blogs - Joy the Baker had just published a recipe that immediately caught my eye - Buttered Popcorn Chocolate Chip Cookies.  Walter loves cookies, chocolate, and popcorn ... so, this cookie was a perfect match.  I printed the recipe off and immediately had to put a halt to baking - only one egg left in the house and no one felt like going out at night.  :(  Oh, well.

This morning after breakfast we went out for a bike sale event and after getting a great deal on a consignment bike for Walter ($15), we picked up some eggs on the way home.  Time to bake.

Of course, I wasn't in the mood for popping corn - it wasn't even noon - so I decided to do some switching out.  Cookies aren't meant to really rise much so I swapped out most of the flour with whole wheat flour, and instead of popcorn I used some Rice Krispies and Corn Flakes.  The end result was incredible - the dark chocolate chips had the right sweetness and the two cereals gave the cookie just the right amount of crunch and chew.  Heaven.

Here are the ingredients (based on what I did):

Unsalted Butter, room temperature - 1/2 cup
Brown Sugar, not packed - 1/2 cup (I used my home made brown sugar)
White Sugar - 1/2 cup

Egg - 1 large
Vanilla - 1 teaspoon

Whole Wheat Flour - 1 cup
All-Purpose Flour - 1/4 cup
Baking Soda - 1/2 teaspoon
Salt - 1/4 teaspoon

Dark Chocolate Chips - 1/2 cup
Rice Krispies - 1 cup
Corn Flakes - 2 cups


Before doing any mixing turn on the oven to 350F (I used the convection setting on my oven so I set the oven to 325F).  Spray two cookie sheets with Pam and set aside.

Get a good sized bowl out and use it to mix the butter with the brown and white sugars until the mix is light and creamy.  Next, add the egg and vanilla, making sure everything is well blended.  Next up is the flours, baking soda, and salt.  At this point you have a basic cookie dough.

By adding the cereals and chocolate chips you take it up a notch.


At this point it was good enough to eat without baking!  Not that I would do that ...


Spoon tablespoons of cookie dough onto the prepared cookie sheets and bake for 10-13 minutes (it only took 9 minutes in the convection oven).  Cool the cookies on a wire rack.

There were originally three cookies on this plate ...


... they were too good to remain untouched.


I call this a healthy and delicious chocolate chip cookie because of the whole wheat flour and the cereals.

Wednesday, January 16, 2013

Meet Our Go To Baking Powder Biscuit

I've been home sick the last couple of days.  Neither Walter nor Manuel have gotten sick, thank God.  Unless we want Manuel to lose 3/4 hour pay to take Walter in I either have to struggle to bring him to Out of School Care (OSC) myself or keep him home.  I decided to keep him home.  He's been totally sweet for the first half hour in the mornings - asking if I need anything, tucking me into bed with one of his stuffed animals.  Then ... well, then he starts to get bored, and I'm forced to get up and keep him entertained while trying to rest.

Now that I'm starting to feel better I decided I would make us some biscuits for lunch.  These are our go to biscuits  We usually have them for breakfast at least once a week, and we whip them up for dinner when it's soup or stew.  They are so easy to make, taste great on their own or spread with jam, and Manuel  loves having the leftovers for coffee break the next day.


If you look on-line or in most cookbooks the recipes for biscuits are quite similar.  Flour (white or wholewheat), salt, leavening (baking powder and/or baking soda), fat (shortening, margarine or butter), and liquid (milk, buttermilk or yogurt, and sometimes eggs) are the main ingredients.

Here's the ingredients for today's biscuits:

Flour - 2 cups
Baking Powder - 1 tablespoon
Salt - 1/2 to 1 teaspoon
Butter, chilled and cubed - 1/3 cup
Yogurt and Milk, combined - 1 cup


For the flour I chose to put a bit of wholewheat flour in this time, so I replaced 1/2 cup of flour with this type of flour.  We don't tend to use too much salt ... so despite the fact that I was using unsalted butter I kept the amount of salt towards the 1/2 teaspoon point.  I used about 2/3 cup yogurt and topped this off with milk, using a spoon to stir until combined.

First, I heated the oven to 425F.

Next, I mixed the dry ingredients in a good sized bowl.  Then I got the butter out of the fridge and cut it into cubes (I have used soft butter and margarine with no problems).  I rubbed the butter into the dry ingredients to the point that there were no longer any big chunks of butter.  You don't want the butter to disappear in the dry ingredients, and you don't need to have uniform bits of butter  In fact, I find some differences in size help in the flakiness of the final product


Once the butter is incorporated I added the wet ingredients and quickly stirred to combine.  Like muffins, you don't want to over stir the biscuit mix.  Once things were mostly incorporated I dumped everything out onto the counter.  Using my hands I kneaded the biscuit dough 6-10 times.  Again, don't over handle as this will make for a tough biscuit that's better for hockey practice then eating!  Quickly roll it into a cylinder, cut into disks and place on a cookie sheet.


Bake for 12 - 14 minutes or until lightly golden.


If you can (!) let them cool just a bit before eating.


I have used this recipe as the basis for cinnamon rolls - using a brown sugar-cinnamon-butter concoction on the bottom of the pan and spread on the biscuit dough ... totally yummy!  I have also put grated cheese, ham, raisins, and chocolate chips in at various times for variety.  Still, the basic version is still this families favourite.  Enjoy!

Monday, December 31, 2012

Christmas, Journeys, and Coming Home ...

This was our last Christmas in our townhouse.  A home where we became a couple, and then parents.  The only home Walter has known.  It's been a wonderful home, full of much joy and happiness.  We'll miss it, but we're also excited about our next home.

Christmas Day was spent at home, with my Mom staying with us to help us celebrate. Walter counted 24 presents with his name on them (!!) ... all were opened and examined in under an hour. He's fast!


I brined our 10-lb turkey the night before after reading so many blogs and articles discussing this technique.  It was so easy to do and tasted incredible. 

Recipe:  24 cups of water, 1 1/2 cups honey, 1 cup coarse salt, 3/4 cup brown sugar, many sprigs of fresh rosemary from our garden, 1 whole garlic bulb peeled and cut into chunks.  All this placed in a big pot to simmer until the salt and sugar had dissolved and blended.  I set it on our outside porch with the lid on to cool in the winter air.  In the meantime I got out a mid-sized cooler and placed ice in bags on the bottom.  Got the turkey out, removing the gizzards and neck (which I used to make gravy).  I placed the turkey in a medium sized clean garbage bag in the cooler and poured the brine in.  I tied it loosely.  Put more ice over, and weighed it all down with several gel ice packs.  I then placed the cooler in our frigidly cold garage overnight.  On Christmas Day I turned the oven on just before 2 PM to 325F.  While the oven warmed up I drained the turkey, wiped it down with paper towels to dry it, and placed it in a large KitchenAid enamel double roaster (that we had purchased a few days ago for $39 - regularly $140).  I melted 1 cup of unsalted butter and brushed it all over the turkey, put the lid on, and placed it in the oven for 2 1/4 hours.  At that point we removed the lid, basted the turkey with the pan drippings and let it continue to roast for 30 minutes.  Then it was out of the oven, lid on to rest, while the rest of the dinner was prepped.

On Boxing Day we headed to the interior to have a few days visit with Manuel's Mom in the Okanagan.  The Hope-Princeton Highway was a bit slushy and slick at times, but our good old Chevy 4x4 K2500 Silverado had no problems getting us there and back.


The drive home was stunning - full of sunshine on fresh, crisp snow.


Now, on New Year's Eve we're home, resting ... before the weekend comes and we start packing!

Happy New Year to everyone - may the coming year bring you much joy and happiness.

Thursday, December 20, 2012

Homemade Brown Sugar

While making the gingerbread house on the weekend I ran out of two things - brown sugar and molasses.

For the brown sugar I used the simple technic of adding molasses to white sugar and rubbing it in until it's completely blended.

You go from this ...


to this ...


For the molasses I used my book "The Food Substitutions Bible" by David Joachim.  This is a great resource to have on hand.  It's basically an A to Z listing of most food items that you use in your kitchen and possible substitutions.  I had almost enough molasses (remember I doubled my recipe so I needed 2 cups of molasses - I was 1/4 cup short).  By using this book I found out I could use honey - which we had plenty of - to top off my 2 cups.  Phew - disaster averted.

Wednesday, December 19, 2012

Gingerbread House Baking

This past weekend Walter, Manuel and I took the time to build a gingerbread house.  Not just your regular five-year-old gingerbread house, but a house that we could practically move into!


Before we got started I checked out the internet for both a recipe and building plans.  The recipe came by way of The Alison Show.  A great website full of crafting and baking.  For the plan ... well, although I found some great ideas, I couldn't find a plan that was quite right.  So, I had to wing it.  Things I learned from winging it?  Don't!  Take the time to draw it out on cardstock, cut it out, tape it out to test it.  It'll save you so much time.

In any case, Walter and I started getting all the ingredients together and making the dough.  (Actually, I sent him off with Daddy to do some storage re-arranging so I could complete this step more quickly.)


Ingredients:
  • Flour - 6 cups
  • Baking Powder - 1/2 teaspoon
  • Ground Ginger - 4 teaspoons
  • Ground Cinnamon - 4 teaspoons
  • Ground Cloves - 1/2 teaspoon
  • Salt - 1/2 teaspoon
  • Butter, softened - 3/4 cup
  • Brown Sugar - 1 1/2 cups
  • Eggs - 2 large
  • Molasses - 1 cup
  • Water - 1 or more tablespoons, if needed
Whisk together the dry ingredients and set aside.  In a mixer cream the butter and sugar together until fluffy (since I don't have a stand mixer I did this by hand).  Add the eggs, one at a time, until blended.  Then add in the molasses.  Now, start adding in the flour mixture, in small batches, blending in as you go.  It will be quite dry - if it's too dry add a tiny bit of water.  It should end up being blended but not sticky.

Divide the dough into four parts and roll each out to 3/8" thickness on wax paper.  You may need a bit of flour if your rolling pin sticks.  Layer these four rolled out dough portions on a cookie sheet using the wax paper as dividers, and place in the freezer for 20 minutes.

Preheat your oven to 350F.

Now you can cut out your gingerbread house using whatever plan you devised.  I doubled the recipe at Manuel's insistence because he thought we would be building big.  I ended up with a LOT of dough - some Walter and I made into gingerbread people, animals, and Christmas images, but I still ended up freezing a lot of dough for a future time.

I found that I needed to spray the cookie sheets with some Pam in order to help the baked gingerbread loosen more easily.  In any case, place your pieces on a cookie sheet and bake for 7-9 minutes.  I used my convection setting and found 8 minutes just right.  Cool on sheet before removing to completely cool.

The next part - the Royal Icing - is the sugary "glue" that keeps all the pieces together.  Alison taught me something new here - meringue powder!  I found mine at Galloway's.  This is a lovely local store that is a great source for European cooking needs as well as having wonderful bulk-style organic items and personal/home care products.  I bought two bags just in case - I have way too much, so I'll have to figure out what else I can make besides royal icing :)

Ingredients:
  • Meringue Powder - 1/2 cup
  • Water - 1 cup (almost)
  • Powdered Sugar - 2 pounds (one of those bags you get in the grocery store)
  • Light Corn Syrup - 2 teaspoons
First, sift the powdered sugar and set aside.  Next, you need to whisk the meringue powder and water until foamy.  I used my hand mixer for this.  It doesn't take long.  Now, slowly add in the powdered sugar.  Mix on low until blended, about 5 minutes.  Then, add in the corn syrup and mix on medium speed until it is glossy and stiff peaks form.

I used a jar and placed sandwich bags over the jar, pushing the bag around the jar opening.  Then I could scoop the royal icing into the bag, press out the air, and zip it up before snipping off a corner - this became my "piping" bag.  I would have used my piping kit but it's in storage until we move.

Because we had made such big sides and roof pieces we found we needed to butter the back side of the pieces with royal icing and let this harden before proceeding.  This made the pieces firmer and more stable.  Even doing this we needed to allow the frame of the house to set over night before completing things the next day.  Yes, a two-day gingerbread house!  To help stabilize the whole structure even more we used toothpicks and bamboo skewers.


Now came the part that Walter was impatiently waiting for - decorating!  We spent Friday morning before work at Save-on-Foods in the bulk section picking out candies to use for this purpose ... plus we picked up some more at Galloway's on Saturday.


I piped while Walter followed behind placing every single piece of candy he could.  He even placed large handfuls inside the house!  We had a great time ... although, when the last piece was stuck on Walter wanted to know if we could start eating the gingerbread house.  I said NO - we need pictures.  And Daddy said NO - we want Oma to see it too!  Every day he asks - so far, we've had enough gingerbread men to keep him occupied!

Wednesday, December 12, 2012

Easy Jam Tart


This recipe comes from the Smitten Kitchen.  I found it in November while I was having fun playing with Deb's "Surprise Me!" link on the left side of her blog.  Great idea!

I don't have a stand mixer (although I plan on getting one once we've moved into our new house) - I simply used my hands for the first part.  I didn't have unsalted butter, so cut back on the salt indicated.  And, I didn't have coarse sugar - I used my homemade brown sugar.  Despite these "limitations" this recipe comes out every time being the most delicious, and elegant sweet treat.  It is equally at home in your lunch bag or served as a special dessert at the end of a lovely dinner with your favourite friends.

Here's the recipe:
  • Flour - 1 1/2 cups
  • Cornmeal - 1/2 cup
  • Baking Powder - 2 teaspoons
  • Salt - 1/2 teaspoon (less if you are using salted butter)
  • Unsalted Butter, room temperature - 9 tablespoons (that's 1/2 cup + 1 tablespoon)
  • Sugar - 1/2 cup
  • Egg, whole - 1 large
  • Egg, separated - 1 large
  • Almond Extract - 1/8 teaspoon
  • Jam - 1 1/3 to 1 3/4 cups
  • Sugar, coarse - 2 tablespoons

In a small bowl combine the first four ingredients.  Stir and set aside.  In a medium to large size bowl combine the butter and sugar - since I didn't have a stand mixer I cut the butter into small pieces, poured in the sugar and used my hands to combine everything really well.  Next, put in the first egg, plus the yolk of the second egg, and the almond extract.  Combine these new ingredients - I used a fork to do this.  [I call this my Amish cooking style since I figure if they can make such delicious food without electricity so can I!]

Next up - use your fork to slowly blend in the dry ingredients into the butter-sugar mixture.  Don't overdo this step.  Just make sure the dry ingredients are incorporated.  Then take a third of the dough and roll it into a 2 inch wide log and wrap it in saran wrap.  Put the dough log in the freezer while you continue on.


Put the rest of the dough into a 9-inch spring form pan.  Press the dough over the bottom and partially up the sides.  Try to get an even layer throughout.  Once you are finished put the pan into the freezer for 30 minutes.


Preheat the oven to 375F.  Take both dough's out of the freezer.  Spread your jam over the bottom of the pan.  Slice the dough log into small, thin disks.  Place the disks in a pretty pattern over the jam.  Froth up the egg white from the second egg and brush this over the disks.  Sprinkle with the coarse sugar.  Bake for 25-30 minutes or until the pie is golden.  Let cool completely.
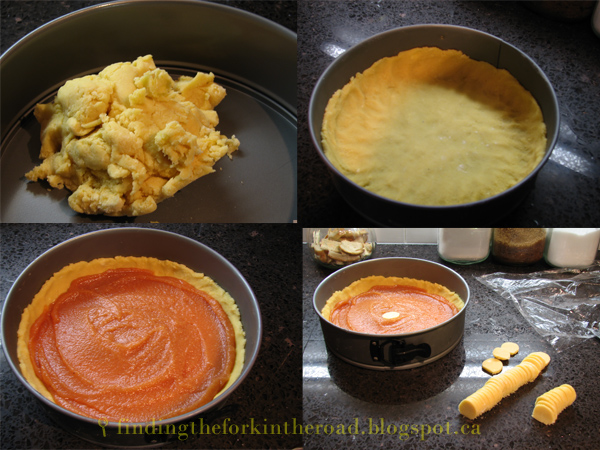

Now - enjoy.

Friday, November 30, 2012

Bagged Cookie Recipe

Today happens to be what is locally known as a Pro-D day, otherwise known as a Professional Development day for teachers.  This means Walter doesn't have school today.  His school includes out of school care, so I could have dropped him off anyway ... but it's nice to just hang around at home and have a lazy day.  Especially since my little guy loves to lounge all day in PJs.

So far, wood train systems have been built, Lego ninja's have fought, and angry birds have flown through the air.  Lots of Halloween candy has been eaten - of course, I did demand an apple be eaten along with the candy ... nutrition is important.

Around noon we decided to make cookies.  I had a bag of dark chocolate chips (50% cacao) from Hershey's Chipits.  They always have recipes on these bags, so instead of hunting down a recipe from one of my many cookbooks or searching the internet I used what Hershey's offered me.  It was an easy recipe to follow.


There was a fair bit of product testing going on to ensure quality control was maintained throughout ... five-year-olds take their job seriously!  I had to oversee things too ...


There are still some cookies left!

Monday, November 19, 2012

Homemade Syrup

I thought I'd share the homemade syrup recipe I found on the Hillbilly Housewife site.

We were spending tons of money on real maple syrup.  It was wonderful, but the price just kept going up and up, and finally we just had enough.  I started looking around and found this recipe.  The first couple of times I did it exactly as stated, but I found the syrup would crystalize after a few weeks.  Not damning, but I knew that some light corn syrup would solve that issue.

Here's the recipe:
  • Water - 2 cups
  • Sugar - 4 cups
  • Molasses - 2 tablespoons
  • Light Corn Syrup - 2 to 4 tablespoons
  • Maple Flavouring - 1 1/2 teaspoons
In a mid-size saucepan combine the water, sugar and molasses (I use blackstrap which some might think is a little too strong).  Heat the contents over a medium stove setting, stirring occasionally until the syrup comes to a delicate bubbling boil.  Once the syrup begins to boil, turn the stove temperature to simmer and cover the pan.  Let it simmer for 10 minutes - don't peak, don't stir.  After 10 minutes remove the pan from the stove.  Take off the lid, stir in the light corn syrup, and let it cool for 15 minutes.  Lastly, stir in the maple flavouring.

I let it cool to room temperature before storing in canning jars or used glass syrup bottles, and keep it stored in the fridge.

This syrup is a fraction of the cost of real maple syrup.  It might not be as wonderful as the real thing, but it's still quite yummy and everybody seems to really like it, coming back for more every time.  In fact, Walter would prefer to drink it straight up ;)


Sunday, November 18, 2012

Blogabout - Collecting Blogs

Some people collect purses; others collect books.  I collect blogs.  I'm in love with the whole concept.  Finding blogs from all over the world, with so many different styles, topics, and ideas.  It's an incredible experience, don't you think?

Today, I thought I'd focus on two food blogs that I particularly like:
Both bring equal amounts of humour and knowledge to the kitchen.

  smittenkitchen.com


Both have beautiful photographs.  Photographs that make the recipes come to life.  They both have an incredibly welcoming tone - you feel like they are "chatting" with you.  They both take the time to explain what's happening in a recipe.  Why certain ingredients are used.  I love that.

I enjoyed Joy's blog so much I purchased her recently published cookbook.  I'm saving my pennies now to buy the Smitten Kitchen cookbook that's also just hit the bookshelves.

Do you have any foodie blogs that you visit frequently?  What makes them special?

Thursday, November 15, 2012

Marmelada

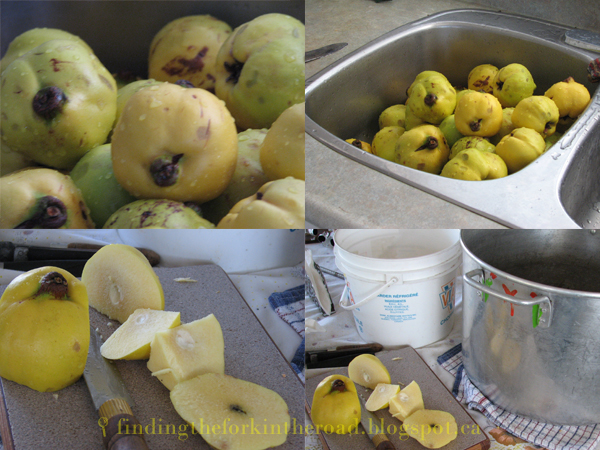
We spent all day this past Saturday making marmelada - quince jam - at Manuel's Moms farm.  Quince are a wonderful fruit ... looking like some funky pear/apple with a wonderful subtle aroma of roses.  You can't eat them raw - they have to be cooked.  And when you cook them the fruit turns a lovely soft pink colour.  We love our marmelada to come out like apple sauce/butter.  Perfect in a bowl or spread on toast.  Pure heaven.


First, we washed them to remove the fuzzy coating they have.  Then cut them up, removing the inner core which remains hard even after cooking, and left the skins on.  Into a pot with a bit of water to help them simmer.  Manuel carried the large pots to the greenhouse where an old woodstove was used.  So much easier than trying to fit these pots on a regular stove!


After the fruit softened, we measured sugar to taste (we don't like our marmelada too sweet so we didn't add too much sugar).  A little longer on the woodstove until the sugar was melted and combined.  Then Manuel used a bamix hand mixer to blend the fruit and skins into a smooth concoction before setting the pots outside in the cold Fall air to cool.  Our last step was to put the jam into whatever containers we had - empty yogurt containers, canning jars, plastic ziploc bags.  Since we freeze our jam until we're ready to use it the containers didn't need to be anything special.

Just typing this post I can smell that lovely rosy jam - hmmm.

Saturday, October 27, 2012

Homemade Pizza - It Really IS Easy

This is a house of pizza-lovers.  Not that we'd eat it every night ... more like once a week.  If it's a weekday or we're both totally exhausted we'll make a delivery order.  But - when it's the weekend and we've got time - we love to make the pizza from scratch.  That means dough, homemade sauce (made ahead in batches to save time), and putting all the trimmings on top.  It's usually a family affair - with me making the dough and the boys putting it all together after I've rolled out the dough.  It does take a bit of time - hence only doing it on the weekends when I can give myself the time to make the dough - but it's so worth it.

I've tried a number of recipes, including some quick no-rise versions, but the one I'm going to give you today is the best.  Simple, elegant, versatile.  It has never failed me.  I'm sure it won't fail you either!

The ingredient list is small.
  • Sugar - 1/2 teaspoon
  • Water, lukewam (105-115F) - 1 cup
  • Active Dry Yeast - 1/4 ounce package (2 1/4 teaspoon)
  • Olive Oil - 1 tablespoon
  • Flour - 2 to 2 1/2 cups (approximately)
  • Coarse Salt - 1/2 teaspoon
  • Olive Oil - 1/2 teaspoon for coating bowl/dough

TOOLS:  Glass Measuring Cup (2 cup size), Large bowl, wooden spoon or spatula for stirring, tools to measure (1/2 cup, 1 tablespoon, 1 teaspoon, 1/2 teaspoon, 1/4 teaspoon), towel to cover bowl, rolling pin, cookie sheet or pizza pan.

Preping the Yeast:  Pizza needs yeast to make it come alive.  Without yeast you'd have a piece of cardboard for your efforts.  Beyond that - there's no surer method to a failed pizza dough than having old yeast so make sure yours isn't past it's prime.  Run the hot water from your kitchen tap until the water feels warm, but not burning hot.  It should feel warmer than your body, like water in a hot tub.  Fill your measuring cup with 1 cup of water.  Stir in the sugar to dissolve and add your yeast.  Set it aside for a few minutes.  The yeast will feed on the sugar in the warmth of the water and will grow.  When the top becomes foamy you've done right.


While the yeast is growing, measure out 1 1/2 cups flour into your large bowl and add your coarse salt.  Stir to combine.  When your yeast is foamy, add 1 tablespoon of olive oil to the liquid and pour immediately into your flour.  Stir with your wooden spoon or spatula until the flour is completely wet.  It will be quite sticky at this point.  Make room on your counter and take a handful of dry flour and sprinkle it about.  Dump your wet dough into this.


Now comes the part that scares most people - you've got to knead the dough.  It takes a bit of practice to get the feel for it, but once you've mastered it you'll realize how simple it is.  At first the dough will be quite sticky.  You'll likely need to rub it off your hands and combine it back into the dough several times as you add more flour and using the heel of your hands push into the dough, lift with your fingers, turn/flip, and again push with the heel of your hands.  This step will take anywhere from 6 - 12 minutes.  The time of year, the weather - both play a factor in this.  Rainy cold days in winter, hot humid days in summer - each causes dough to behalf differently.  This will also affect how much flour you'll end up adding as you knead.  You are looking for the classic babies skin feel - soft, somewhat pliant, smooth to the touch.  Remember not to add too much flour - dry, coarse dough won't make an edible pizza.


Once you've reached this point it's time to set the dough aside.  I take a few minutes at this point to clean out my large bowl, dry it, and add a little olive oil to the bottom.  Then I drop my dough into this bowl and roll it around so that the dough is glossy with oil.  This step prevents dry, cracking dough skin from forming while the dough rests and rises.  Cover with a lint-free tea towel and place out of drafts for around 70 minutes.  I put mine in the microwave (just make sure that if you use the microwave timer - that you hit the timer and don't accidentally start the cooking cycle of the microwave ... yes, I've nearly ruined dough this way!).


After 70 minutes (or so), your dough should have doubled in size.  [Take a moment to turn your oven to 400F at this point.]  Flour your counter lightly and pull your dough out of the bowl and knead it a few times (yes, it will deflat - that's OK).  Using your rolling pin, roll your dough out to the size of your cookie sheet or pizza pan.  Place the rolled out dough on your pan - likely you'll have to stretch and push it a bit to conform.  Let it rest a few minutes while you gather your toppings.

Spread your sauce out first - white, red, lot's or just a little - it's your choice.  Next any toppings you want - veggies, meats - anything that takes your fancy.  Finally, pick your cheese.  Most often we use Gouda here.  Yes ... Gouda.  We buy it by the wheel - it's eaten every day in this house.  With so much around, it's a natural for our pizza.  But, be a purist if you want and use mozarella.

Now.  It's time.  Place it in the oven.  Set your timer for 15 minutes to begin with.  Nobody wants burnt pizza.  Especially when you've gone to the trouble of making the dough.  After 15 minutes check your pizza.  Are the toppings bubbly?  Is the crust golden?  If so, it's ready.  If not, give it a few more minutes.  When it's ready, give it a few minutes rest on a cutting board before slicing it up and devoring.