I do a lot of baking which means I have a lot of baking sheets, muffin tins, pizza trays, and other large, awkward pieces that are hard to store. Up until recently I kept them in one of the bottom cupboards in the kitchen. Every time I needed one of the cookie sheets (or something not even related to these cumbersome pieces, but stored nearby) I usually ended up with everything cascading out onto the floor or sliding sideways into other areas of the cupboard. I'm sure you can relate.
If you wanted that third cookie sheet from the bottom? Ouch.
Then, several months ago I bought one of Ina Garten's cookbooks. You know Ina, right? The Barefoot Contessa? A wonderful cook, evoking elegance, grace, comfort, and friends and families. I have five of her cookbooks now and have tried several recipes - all have been incredibly delicious. From her "barefoot contessa how easy is that?" cookbook I found a great idea at the back of the book for keeping large kitchen pieces accessible - a large wicker basket kept near the kitchen prep area.
It seemed like such a good idea. I tried it out by using a cardboard box - it worked like a charm. Everything was accessible, nothing crashed. It also meant that the space in the cupboards could be utilized much better. A win-win.
Now that I knew it would solve our storage problems I needed to find a proper basket. Sounded simple, but finding that perfect rectangular basket with enough height (but not too much) was more difficult than I originally thought. There were a lot of baskets that were just too short, and others that were too tall and more like clothes hampers. Finally, this week I found the perfect basket at my local London Drugs. The Water Hyacinth Frameless Basket had a tag reading $9.99. The price was right, but it was even better when I got to the checkout counter and found it was on sale for $5.99!
I moved everything from that temporary cardboard box to the new basket - everything fit perfectly.
There's still space to spare.
I'm really happy with this cheap, yet elegant solution.
Where do you keep your baking sheets? Would you consider using a basket left out in the kitchen?
Showing posts with label decorating. Show all posts
Friday, November 22, 2013
Wednesday, October 23, 2013
Dining Room Chairs - ReUpholstery Update
Just so you don't think I've forgotten.
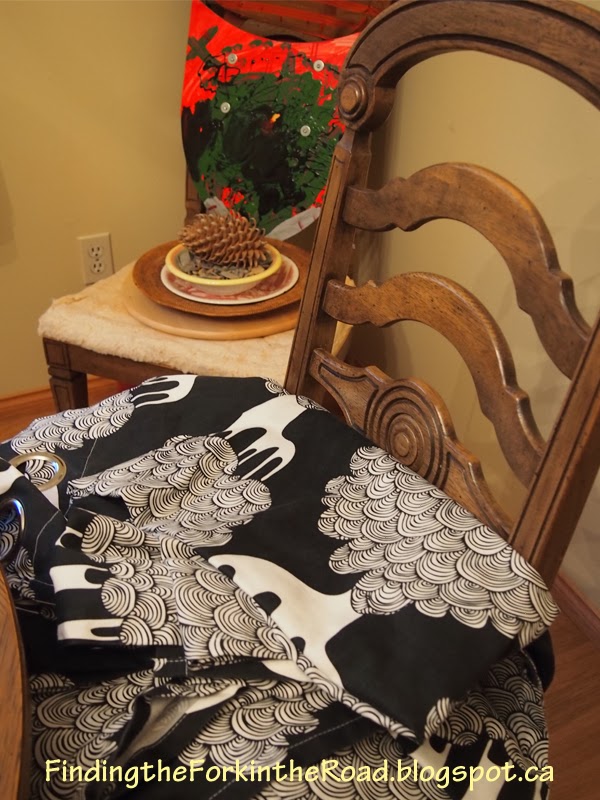
See? I actually pulled out the package of Ikea curtain fabric two weekends ago and washed it. Then? It sat on my chair by my bed for another week. Last weekend I finally found the tools I'd been using to pull off the old seat covers (we had guests, things got moved, I couldn't find things for quite a while). I brought them up from the basement and they sat on the dining room table for the week. Yesterday, I moved the washed curtain fabric to the dining room. This is progress, right?!
You can see the chair in the background, naked, without any fabric. It's been waiting all this time to be re-covered.
I'm hoping my inertia on this project will slowly give way ... and that finally that first chair will no longer be naked. At this rate, the seven chairs will all be re-covered by ... ah, I can't even think how long that will be. I've got to get this thing done!
See? I actually pulled out the package of Ikea curtain fabric two weekends ago and washed it. Then? It sat on my chair by my bed for another week. Last weekend I finally found the tools I'd been using to pull off the old seat covers (we had guests, things got moved, I couldn't find things for quite a while). I brought them up from the basement and they sat on the dining room table for the week. Yesterday, I moved the washed curtain fabric to the dining room. This is progress, right?!
You can see the chair in the background, naked, without any fabric. It's been waiting all this time to be re-covered.
I'm hoping my inertia on this project will slowly give way ... and that finally that first chair will no longer be naked. At this rate, the seven chairs will all be re-covered by ... ah, I can't even think how long that will be. I've got to get this thing done!
Labels:
decorating,
DIY,
how-to
Sunday, September 15, 2013
Quick Tweak - Hidden In Plain Sight
I'm still getting up my nerve to re-cover my first dining room chair. In the meantime, I thought I'd share a quick tweak I did that makes life easier while remaining stylish.
Please note that this tweak is really meant for the women reading this blog ... having said that, you gentlemen might find another use for this tweak ;)
When it's that time of the month I always find it a hassle to make sure I have things on-hand. Then I came up with a great (dare I say, genius?!) idea. While shopping at Ikea I came across these cute woven containers - three in a set with lids included (Fryken - $14.99 CAD).
I thought they were adorable, but at first wasn't sure what I could use them for. Then it came to me - a decorative storage container to sit on the back of the toilet.
With the lid on you have no idea about what hides beneath ...
Handy, but discreet.
What have you got hiding in plain sight?
Please note that this tweak is really meant for the women reading this blog ... having said that, you gentlemen might find another use for this tweak ;)
When it's that time of the month I always find it a hassle to make sure I have things on-hand. Then I came up with a great (dare I say, genius?!) idea. While shopping at Ikea I came across these cute woven containers - three in a set with lids included (Fryken - $14.99 CAD).
With the lid on you have no idea about what hides beneath ...
Handy, but discreet.
What have you got hiding in plain sight?
Friday, September 06, 2013
Finding a Cheap Solution to Recovering Chairs
Remember, in July, when I started to take the fabric off the seats of the dining room chairs? Remember that?
Well, I didn't get any further. Part of it was the daunting task of pulling out all those staples, part was the daunting task of stapling on new fabric. But the biggest obstacle was fabric. There are seven chairs. That's a fair chunk of fabric. I did have some different fabrics already ... but none of them really made me happy - they were either too flimsy for seats, not the right colour-pattern-style, or I just didn't have enough to do everything. So, I put it on the back-burner while I thought of possible solutions. Intermittently, throughout July and August, I checked out possible solutions ... I checked fabric stores - nothing caught my eye. I even thought about using bed linen - but couldn't find something that just hit that sweet spot. Then yesterday, whileworshipping visiting Ikea I saw some curtains. Funky pattern - check. Two colour options (blue with white, or black with white) - check. Fabric thick - check. The best part of it? They were marked down to $14.99 for two big panels. More than enough to do all the chairs. Check, check, check. Happy girl here!
Kajsamia - funky, thick, and cheap - I think it will be perfect as a chair fabric. It won't be just a plain, solid colour, yet the black base should make it work with almost any colour scheme we finally develop for the dining room. The pattern of the trees echoes the forest view from the windows of this space, and at the same time provides a bit of whimsy.
Well, I didn't get any further. Part of it was the daunting task of pulling out all those staples, part was the daunting task of stapling on new fabric. But the biggest obstacle was fabric. There are seven chairs. That's a fair chunk of fabric. I did have some different fabrics already ... but none of them really made me happy - they were either too flimsy for seats, not the right colour-pattern-style, or I just didn't have enough to do everything. So, I put it on the back-burner while I thought of possible solutions. Intermittently, throughout July and August, I checked out possible solutions ... I checked fabric stores - nothing caught my eye. I even thought about using bed linen - but couldn't find something that just hit that sweet spot. Then yesterday, while
Kajsamia - funky, thick, and cheap - I think it will be perfect as a chair fabric. It won't be just a plain, solid colour, yet the black base should make it work with almost any colour scheme we finally develop for the dining room. The pattern of the trees echoes the forest view from the windows of this space, and at the same time provides a bit of whimsy.
Monday, July 08, 2013
Chairs Apart
I can't take them anymore. Have a look.
No, look closer.
Not only is the colouring not my style, but the fabric is old and dirty. Since we don't generally eat in the dining room I haven't really bothered with these chairs (eight chairs - six armless, two with arms). I have known that at some point we would re-cover them ... probably when we found the right fabric. But this past week, a week in which I had taken some time off and was with them every day ... I just couldn't take it anymore. I had to see what I could do about them. I started by taking the seat off one chair.
And then I started to pry those old, deeply imbedded staples. Ugh. It's hard work. I'm using a small knife, chisel and pliers (from Manuel), and lots of concentration.
See this label?
Ah - that red and gold fabric isn't even the original stuff.
I'm still debating fabrics, and might try a few before getting it right. I'll let you know as things progress ... slowly I'm sure as those staples are brutal.
No, look closer.
Not only is the colouring not my style, but the fabric is old and dirty. Since we don't generally eat in the dining room I haven't really bothered with these chairs (eight chairs - six armless, two with arms). I have known that at some point we would re-cover them ... probably when we found the right fabric. But this past week, a week in which I had taken some time off and was with them every day ... I just couldn't take it anymore. I had to see what I could do about them. I started by taking the seat off one chair.
And then I started to pry those old, deeply imbedded staples. Ugh. It's hard work. I'm using a small knife, chisel and pliers (from Manuel), and lots of concentration.
See this label?
Ah - that red and gold fabric isn't even the original stuff.
I'm still debating fabrics, and might try a few before getting it right. I'll let you know as things progress ... slowly I'm sure as those staples are brutal.
Sunday, July 07, 2013
We Have Curtains
Goal #3 for July ... replacing Walter's curtains with something darker that featured frogs. DONE. Phew. And let me tell you - it wasn't easy. The sewing gods were against me.
I had purchased enough material to get three panels, one of which I cut in half so that it could be attached to the other two panels to make wider curtain panels. The cutting went fine. Sewing the half panel to the first full panel went fine. When I did the second one I sewed it wrong, managing to get the seam to the front side. Ugh - I had to manually, and carefully, pull out the thread for the whole thing and re-do it properly. Next, I ran out of top thread. Had to stop and re-thread a new bobbin (thankfully I had bought two when buying the material for the curtains). The first one I selected was, I realized, too thick. After doing one edge with it and seeing the rough outcome I decided to switch to the other new bobbin. Next, the bottom thread ran out. Had to stop and use the sewing machine to wrap new thread on. Then the thread managed to get stuck underneath and jammed the sewing machine. I got it cleaned up, but in doing so managed to get things out of line. The needle could no longer go through properly. I struggled to fix it, Manuel tried. I took the rest of the night off. Bummed. The next morning I decided to pull out the old trusty manual sewing machine that my Mother had decided to give me. It was the one I had learned on as a teenager. My Mother no longer needed it as she had recently purchased a simple electric one. At the time I had stored it away in the basement, unsure what I would do with it. Opening the case I wasn't sure what to expect. All those years ago ... it all came back to me. I needed to put top and bottom thread in. No problem. I was up and running within 10 minutes.
Initially, it was a bit strange having to use my right hand to make the stitching happen, but it wasn't hard. In less than 30 minutes the curtains were done - no electricity needed. They still let some light in, but not as much as the yellow ones did. Plus they are much wider than the old ones, meaning they give a better definition to the window. Walter likes them, which is important. I still need to get a few more clip rings to make them hang better, but they are perfectly serviceable (and enjoyable) as they are.
I had purchased enough material to get three panels, one of which I cut in half so that it could be attached to the other two panels to make wider curtain panels. The cutting went fine. Sewing the half panel to the first full panel went fine. When I did the second one I sewed it wrong, managing to get the seam to the front side. Ugh - I had to manually, and carefully, pull out the thread for the whole thing and re-do it properly. Next, I ran out of top thread. Had to stop and re-thread a new bobbin (thankfully I had bought two when buying the material for the curtains). The first one I selected was, I realized, too thick. After doing one edge with it and seeing the rough outcome I decided to switch to the other new bobbin. Next, the bottom thread ran out. Had to stop and use the sewing machine to wrap new thread on. Then the thread managed to get stuck underneath and jammed the sewing machine. I got it cleaned up, but in doing so managed to get things out of line. The needle could no longer go through properly. I struggled to fix it, Manuel tried. I took the rest of the night off. Bummed. The next morning I decided to pull out the old trusty manual sewing machine that my Mother had decided to give me. It was the one I had learned on as a teenager. My Mother no longer needed it as she had recently purchased a simple electric one. At the time I had stored it away in the basement, unsure what I would do with it. Opening the case I wasn't sure what to expect. All those years ago ... it all came back to me. I needed to put top and bottom thread in. No problem. I was up and running within 10 minutes.
Initially, it was a bit strange having to use my right hand to make the stitching happen, but it wasn't hard. In less than 30 minutes the curtains were done - no electricity needed. They still let some light in, but not as much as the yellow ones did. Plus they are much wider than the old ones, meaning they give a better definition to the window. Walter likes them, which is important. I still need to get a few more clip rings to make them hang better, but they are perfectly serviceable (and enjoyable) as they are.
Friday, July 05, 2013
New Interior Decorator in the House!
My on-going decorating of the house must be rubbing off ... I have a budding decorator in the house!
He wanted to create something that added to the decor. He took his crayons and with deliberate choices placed them in a pattern within the frame of this box that the lamp sits on.
I love the colours and patterns. It immediately made Manuel and me smile. And Walter? He was very proud of the results!
He wanted to create something that added to the decor. He took his crayons and with deliberate choices placed them in a pattern within the frame of this box that the lamp sits on.
I love the colours and patterns. It immediately made Manuel and me smile. And Walter? He was very proud of the results!
Thursday, July 04, 2013
Curtain Fabric
Would you believe I'm working on another July goal? Yes, it's true.
Goal #3 - curtains for Walter's bedroom. I went to Fabricana in Richmond. This is a great store for fabric-obsessed shoppers. A huge main floor plus a large mezzanine, all devoted to fabric. I wandered around a bit, but then honed in on the quilting section. This area has a large selection of cotton, and cotton-mixed fabrics with wonderful patterns. I was a little worried about the fabric theme Walter wanted - frogs ... but it wasn't long before I found multiples. Cute ones, serious ones, colourful ones, subtle ones. So many to choose from. I finally settled on a fabric that had a black background with happy, colourful, smiling frogs all around.
The black background should help with the sunlight at bedtime, and the colourful frog pattern is just plain smile-inducing.
Oh, and another fabric caught my eye.
I decided Walter's old yellow curtains will go in the guest bedroom. I'm thinking this fabric will be used in the master bedroom. It has a subtle geometric pattern and several colours to choose from as a basis for other decorating decisions that need to be made ... for instance, wall colours and bed linen.
Tomorrow I hope to measure out the new curtains for Walter's bedroom and start sewing, sewing baby.
Goal #3 - curtains for Walter's bedroom. I went to Fabricana in Richmond. This is a great store for fabric-obsessed shoppers. A huge main floor plus a large mezzanine, all devoted to fabric. I wandered around a bit, but then honed in on the quilting section. This area has a large selection of cotton, and cotton-mixed fabrics with wonderful patterns. I was a little worried about the fabric theme Walter wanted - frogs ... but it wasn't long before I found multiples. Cute ones, serious ones, colourful ones, subtle ones. So many to choose from. I finally settled on a fabric that had a black background with happy, colourful, smiling frogs all around.
The black background should help with the sunlight at bedtime, and the colourful frog pattern is just plain smile-inducing.
Oh, and another fabric caught my eye.
I decided Walter's old yellow curtains will go in the guest bedroom. I'm thinking this fabric will be used in the master bedroom. It has a subtle geometric pattern and several colours to choose from as a basis for other decorating decisions that need to be made ... for instance, wall colours and bed linen.
Tomorrow I hope to measure out the new curtains for Walter's bedroom and start sewing, sewing baby.
Labels:
decorating,
DIY,
goals
Subscribe to:
Posts (Atom)